Unzip by clicking ‘Extract All”
Our template is saved to the desktop in this example.
Open the “Read Me” file to download the required fonts for your template

Click on the links to Install the fonts listed under “Fonts Used”

These links will direct you to a webpage that contains the fonts as free downloads.
Download load all the fonts used in the design.
Now that you have the fonts downloaded, you need to install them.

Once you have downloaded each font, double click the included ‘.ttf’ file, this is the file that will allow you to install your font.
The “Fonts’ application will open as you can see in the above image.
Click the install button.
That’s all you need to do to complete installation of the font. Do this with each font that’s required for your design.
Now let’s open the template in Photoshop for customisation.

Click on ‘Photoshop.psd’ file inside your template folder.
Now you have your design open in Photoshop you need to hide the bleed layer first

To hide the bleed layer;
Click on the ‘eyeball’ icon beside the layer.
Note – You can toggle this icon on and off to make layers visible and also to hide layers.
Next, let’s change the background colour

Again, select the ‘eyeball’ icon on the layer that reads ‘background colour’ to make it visible.
This is the hue and saturation layer.
By making this layer visible you can make adjustments that will affect the colour of the layer below.
Now that you’ve made the “Hue & Saturation” layer visible, double click this little icon on the layer

This will open a small window that will allow you to make colour adjustments.
Use this “Hue” slider to adjust the layers colour

As you move the slider in either direction you’ll see the colours on your background change.
You can also adjust the ‘Saturation’ slider here and the ‘Lightness’ slider to make further adjustments to get the right density and vibrancy for the colours.
Now that we have the background colours how we like them, we can adjust the text colour

It’s the same process as above, make the ‘Hue & Saturation’ layer above the text layer visible by clicking the ‘Eyeball’ icon.
Adjust the sliders to affect the colour of the text

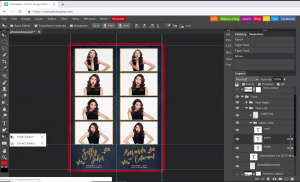
After you’re happy with the colour you can change the text to suit your written details.
Firstly, click on the ‘T’ tool over on the left.
Once you have the ‘T’ tool selected, click on the text you want to change

Now type in your replacement text

For this example we replaced the original text with “Jessica Lee”
Now, let’s adjust the colour of the frames to match the text colour

First, you need to unhide the hue and saturation layer named “Frames Colour”
Now to change the text colours, double click the icon to open the slider window.

Adjust the sliders to affect the colour of the frames

Because I’ve made the frames blue I’ve decided to go back and make the text blue also

Now that we’re happy with the design, the next step is to export the changes

First, hide the frames layer
And hide the photos layer

Now you’re just left with the background and text, so let’s save the new background layer

Click File>Save As
Select .jpg from the dropdown

Replace the ‘background.jpg’ file

Replace the ‘background.jpg’ file
The background.jpg file is inside the original template folder you unzipped at the start of this guide.
Be sure to set the quality to 12 and press ok

Next, we need to save the new overlay layer. So hide all layers except the frames layer

Click on “File” then “Save As” from the dropdown menu

Select “.png” from the file types dropdown

Replace ‘overlay.png’

The overlay.png file is inside the original template folder you unzipped at the start of this guide.
Awesome! You can now exit Photoshop

You don’t need to save here
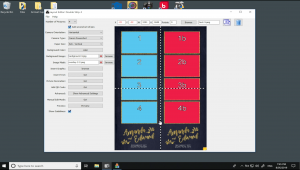
Now let’s load the new design into Photoboof 7

Open the Photoboof 7 application
Click on “Layout Editor” under the file menu

Click on “File>Import”

Import the file titled “Photoboof.zip”

The “Photoboof.zip” file is inside the original template folder you unzipped at the start of this guide.
Now you’ll see the original template design WITHOUT your new customisations

Click the “X’ icons next to background image and image mask

This will remove the original background and overlay files.
You are going to replace these in the next steps with your updated design.
Now we need to delete the original text. Click your mouse on the text to select it

Press the trash bin icon on the top right to delete the text layer

To import your new background, click the “Browse” button next to “Background Image”

Open your new “background.jpg” file that you saved from Photoshop

This file is in the unzipped template folder from the start of this guide.
Now load in your new overlay, click the “browse” button next to image mask

Import the “overlay.png” file

Now you can see your final design with the changes you’ve made inside Photoboof 7

You’re all done! Click “File>Exit”

Select “Yes’ to save the updated template

Your new design is now loaded into Photoboof 7!

Now run Photoboof 7
Click ‘Viewer>Show Viewer Monitor 1″ to launch the Photoboof software
Your design is now loaded into Photooboof and ready to print! Nice job!
Unzip your new template Unzip by clicking 'Extract All" Our template is saved to the desktop in this example. Open the "Read Me" file to download the required fonts for your template Click on the links to Install the fonts listed under "Fonts Used" These links will direct you to a webpage that contains the [...]